Selamat Malam , kali ini saya akan mencoba menjelaskan bagaimana cara membuat logo untuk aplikasi windows phone 8 .
pertama tama yang diperlukan adalah
1. PC
2. Mouse (optional)
3. Software Pengolah Gambar cth: Adobe Photoshop
Setelah semua komponen di atas sudah tersedia mari kita pelajari berapa ukuran dari logo yang akan kita buat
1. Ukuran Logo harus 300 x 300 Pixel
2. Diusahakan Bersudut Kotak , karena desain dari wp8 menggunakan modern UI
Mari kita Buat logo nya
1. Buat Logo yang kamu inginkan pada software khusus desain gambar seperti adobe photoshop, paint, atau adobe ilustrator dll, dengan ukuran yang telah di jelaskan sebelumnya yaitu 300 x 300 pixel
2. Save logo kalian dengan format .png
3. Buka project wp8 yang akan kalian tambahkan logo nya
4. pada bagian solution explorer buka appmanifest.xaml lalu pada bagian bawah terdapat Field pengisisan Logo ,
5. Upload logo yang telah kalian buat sebelumnya untuk ukuran small dan medium
setelah itu build kembali project kalian
Selesai Sudah sharing ilmu kali ini , semoga bermanfaat !
Tampilkan postingan dengan label Aplikasi. Tampilkan semua postingan
Tampilkan postingan dengan label Aplikasi. Tampilkan semua postingan
Rabu, 24 Juli 2013

Sabtu, 20 Juli 2013
Membuat RSS feed Page Sederhana pada Wp8
Selamat Pagi kawan , kali ini saya akan mencoba menjelaskan tentang membuat sebuah RSS feed sederhana pada sebuah Application Page yang ada di windows phone 8
check this out !
1. Buat projek baru di micrsoft visual studio berenjeni windows phone apps
2. Tambahkan Refference System.ServiceModel.Syndycation
caranya , pada bagian solution explorer ada tulisan reference klik kanan add reference
lalu klik browse , dan pergi ke direktoi
C:\Program Files (x86)\Microsoft SDKs\Silverlight\v4.0\Libraries\Client
cari file .dll bernama System.ServiceModel.Syndycation klik Add , kemudian klik Ok ,
setelah selesai menambahkan reference mari kita mulai membuat rss sederhana
tulisakan kode ini pada bagian bawah dari <!--layout root ....>
<Grid x:Name="LayoutRoot" >
<Grid.Background>
<ImageBrush ImageSource="/Assets/AlignmentGrid.png"/>
</Grid.Background>
<Grid.RowDefinitions>
<RowDefinition Height="Auto"/>
<RowDefinition Height="*"/>
</Grid.RowDefinitions>
<!--TitlePanel contains the name of the application and page title-->
<StackPanel Grid.Row="0" Margin="12,17,0,28">
<TextBlock Text="Contoh" Margin="121,-7,0,0" Style="{StaticResource PhoneTextTitle1Style}" Foreground="#FF0202FF"/>
</StackPanel>
<!--ContentPanel - place additional content here-->
<Grid x:Name="ContentPanel" Grid.Row="1" Margin="0,0,12,0">
<Button Content="Muat Berita" Height="72" HorizontalAlignment="Left" Margin="136,0,0,0" Name="loadFeedButton" VerticalAlignment="Top" Width="195" Click="loadFeedButton_Click" BorderBrush="Blue" Foreground="Blue" />
<ListBox Name="feedListBox" Height="468" HorizontalAlignment="Left" Margin="20,100,0,0" VerticalAlignment="Top" Width="444" ScrollViewer.VerticalScrollBarVisibility="Auto" SelectionChanged="feedListBox_SelectionChanged" Foreground="Blue">
<ListBox.ItemTemplate>
<DataTemplate>
<StackPanel VerticalAlignment="Top">
<TextBlock TextDecorations="Underline" FontSize="24" Name="feedTitle" TextWrapping="Wrap" Margin="12,0,0,0" HorizontalAlignment="Left" Foreground="{StaticResource PhoneAccentBrush}" Text="{Binding Title.Text, Converter={StaticResource RssTextTrimmer}}" />
<TextBlock Name="feedSummary" TextWrapping="Wrap" Margin="12,0,0,0" Text="{Binding Summary.Text, Converter={StaticResource RssTextTrimmer}}" />
<TextBlock Name="feedPubDate" Foreground="{StaticResource PhoneSubtleBrush}" Margin="12,0,0,10" Text="{Binding PublishDate.DateTime}" />
</StackPanel>
</DataTemplate>
</ListBox.ItemTemplate>
</ListBox>
<Border BorderBrush="{StaticResource PhoneSubtleBrush}" BorderThickness="1" Height="2" HorizontalAlignment="Left" Margin="20,88,0,0" Name="border1" VerticalAlignment="Top" Width="438" />
</Grid>
</Grid>
setelah itu maka akan tampil di bagian desain penampakanya seperti ini


kurang lebih seperti itulah penulisan nya , setelah itu , perlu di perhatikan pada bagian xaml.cs ini kita wajib mengisikan alamat RSS yang nantinya akan kita tampilkan di application page kita ,maka dari itu tambahkan url nya pada bagian seperti gambar di bawah ini
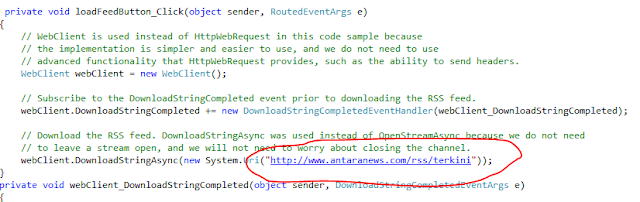 sebagai contoh saya menggunakan RSS feed dari antara news , maka url nya harus seperti yang tetrtera pada gambar di atas ,
setelah itu jalankan apps dengan menekan F5 maka akan tampil seperti gambar di bawah ini

check this out !
1. Buat projek baru di micrsoft visual studio berenjeni windows phone apps
2. Tambahkan Refference System.ServiceModel.Syndycation
caranya , pada bagian solution explorer ada tulisan reference klik kanan add reference
lalu klik browse , dan pergi ke direktoi
C:\Program Files (x86)\Microsoft SDKs\Silverlight\v4.0\Libraries\Client
cari file .dll bernama System.ServiceModel.Syndycation klik Add , kemudian klik Ok ,
setelah selesai menambahkan reference mari kita mulai membuat rss sederhana
tulisakan kode ini pada bagian bawah dari <!--layout root ....>
<Grid x:Name="LayoutRoot" >
<Grid.Background>
<ImageBrush ImageSource="/Assets/AlignmentGrid.png"/>
</Grid.Background>
<Grid.RowDefinitions>
<RowDefinition Height="Auto"/>
<RowDefinition Height="*"/>
</Grid.RowDefinitions>
<!--TitlePanel contains the name of the application and page title-->
<StackPanel Grid.Row="0" Margin="12,17,0,28">
<TextBlock Text="Contoh" Margin="121,-7,0,0" Style="{StaticResource PhoneTextTitle1Style}" Foreground="#FF0202FF"/>
</StackPanel>
<!--ContentPanel - place additional content here-->
<Grid x:Name="ContentPanel" Grid.Row="1" Margin="0,0,12,0">
<Button Content="Muat Berita" Height="72" HorizontalAlignment="Left" Margin="136,0,0,0" Name="loadFeedButton" VerticalAlignment="Top" Width="195" Click="loadFeedButton_Click" BorderBrush="Blue" Foreground="Blue" />
<ListBox Name="feedListBox" Height="468" HorizontalAlignment="Left" Margin="20,100,0,0" VerticalAlignment="Top" Width="444" ScrollViewer.VerticalScrollBarVisibility="Auto" SelectionChanged="feedListBox_SelectionChanged" Foreground="Blue">
<ListBox.ItemTemplate>
<DataTemplate>
<StackPanel VerticalAlignment="Top">
<TextBlock TextDecorations="Underline" FontSize="24" Name="feedTitle" TextWrapping="Wrap" Margin="12,0,0,0" HorizontalAlignment="Left" Foreground="{StaticResource PhoneAccentBrush}" Text="{Binding Title.Text, Converter={StaticResource RssTextTrimmer}}" />
<TextBlock Name="feedSummary" TextWrapping="Wrap" Margin="12,0,0,0" Text="{Binding Summary.Text, Converter={StaticResource RssTextTrimmer}}" />
<TextBlock Name="feedPubDate" Foreground="{StaticResource PhoneSubtleBrush}" Margin="12,0,0,10" Text="{Binding PublishDate.DateTime}" />
</StackPanel>
</DataTemplate>
</ListBox.ItemTemplate>
</ListBox>
<Border BorderBrush="{StaticResource PhoneSubtleBrush}" BorderThickness="1" Height="2" HorizontalAlignment="Left" Margin="20,88,0,0" Name="border1" VerticalAlignment="Top" Width="438" />
</Grid>
</Grid>
setelah itu maka akan tampil di bagian desain penampakanya seperti ini

yap kita telah berhasil membuat interface dari simple apps rss reader kita ,
langkah selanjutnya double klik pada button muat berita
maka file xaml.cs akan terbuka
lalu tambahkan
using System.IO;
using System.ServiceModel.Syndication;
using System.Xml;
using Microsoft.Phone.Tasks;
pada bagian teratas dari xaml.cs nya
setelah itu masukan kode ini di bagian class nya
setelah Initial component ()
private void loadFeedButton_Click(object sender, RoutedEventArgs e)
{
// WebClient is used instead of HttpWebRequest in this code sample because
// the implementation is simpler and easier to use, and we do not need to use
// advanced functionality that HttpWebRequest provides, such as the ability to send headers.
WebClient webClient = new WebClient();
// Subscribe to the DownloadStringCompleted event prior to downloading the RSS feed.
webClient.DownloadStringCompleted += new DownloadStringCompletedEventHandler(webClient_DownloadStringCompleted);
// Download the RSS feed. DownloadStringAsync was used instead of OpenStreamAsync because we do not need
// to leave a stream open, and we will not need to worry about closing the channel.
webClient.DownloadStringAsync(new System.Uri("http://www.antaranews.com/rss/terkini"));
}
private void webClient_DownloadStringCompleted(object sender, DownloadStringCompletedEventArgs e)
{
if (e.Error != null)
{
Deployment.Current.Dispatcher.BeginInvoke(() =>
{
// Showing the exact error message is useful for debugging. In a finalized application,
// output a friendly and applicable string to the user instead.
MessageBox.Show(e.Error.Message);
});
}
else
{
// Save the feed into the State property in case the application is tombstoned.
this.State["feed"] = e.Result;
UpdateFeedList(e.Result);
}
}
// This method determines whether the user has navigated to the application after the application was tombstoned.
protected override void OnNavigatedTo(System.Windows.Navigation.NavigationEventArgs e)
{
// First, check whether the feed is already saved in the page state.
if (this.State.ContainsKey("feed"))
{
// Get the feed again only if the application was tombstoned, which means the ListBox will be empty.
// This is because the OnNavigatedTo method is also called when navigating between pages in your application.
// You would want to rebind only if your application was tombstoned and page state has been lost.
if (feedListBox.Items.Count == 0)
{
UpdateFeedList(State["feed"] as string);
}
}
}
// This method sets up the feed and binds it to our ListBox.
private void UpdateFeedList(string feedXML)
{
// Load the feed into a SyndicationFeed instance
StringReader stringReader = new StringReader(feedXML);
XmlReader xmlReader = XmlReader.Create(stringReader);
SyndicationFeed feed = SyndicationFeed.Load(xmlReader);
// In Windows Phone OS 7.1, WebClient events are raised on the same type of thread they were called upon.
// For example, if WebClient was run on a background thread, the event would be raised on the background thread.
// While WebClient can raise an event on the UI thread if called from the UI thread, a best practice is to always
// use the Dispatcher to update the UI. This keeps the UI thread free from heavy processing.
Deployment.Current.Dispatcher.BeginInvoke(() =>
{
// Bind the list of SyndicationItems to our ListBox
feedListBox.ItemsSource = feed.Items;
loadFeedButton.Content = "Perbaharui";
});
}
// The SelectionChanged handler for the feed items
private void feedListBox_SelectionChanged(object sender, SelectionChangedEventArgs e)
{
ListBox listBox = sender as ListBox;
if (listBox != null && listBox.SelectedItem != null)
{
// Get the SyndicationItem that was tapped.
SyndicationItem sItem = (SyndicationItem)listBox.SelectedItem;
// Set up the page navigation only if a link actually exists in the feed item.
if (sItem.Links.Count > 0)
{
// Get the associated URI of the feed item.
Uri uri = sItem.Links.FirstOrDefault().Uri;
// Create a new WebBrowserTask Launcher to navigate to the feed item.
// An alternative solution would be to use a WebBrowser control, but WebBrowserTask is simpler to use.
WebBrowserTask webBrowserTask = new WebBrowserTask();
webBrowserTask.Uri = uri;
webBrowserTask.Show();
}
}
}

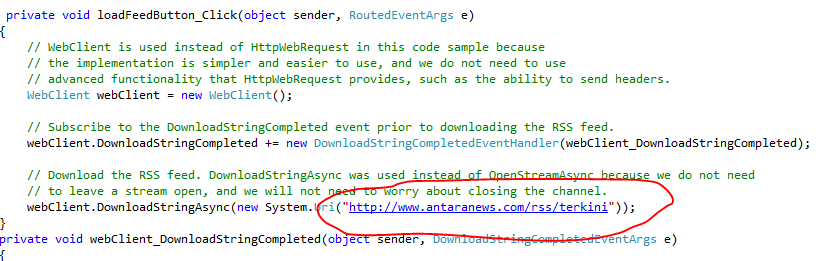
setelah itu jalankan apps dengan menekan F5 maka akan tampil seperti gambar di bawah ini

Yappp Selamat Kamu berhasil membuat Aplikasi RSS pertama kamu !
Kamis, 18 Juli 2013
Merancang Aplikasi Windows Phone 8 Berbasis RSS feed (bag3)
Halo selamat Pagi , Pada kesempatan kali ini saya akan melanjutkan artikel saya yang sebelumnya tentang perancangan sketchflow , yang bisa kalian lihat pada link Merancang Aplikasi Windows Phone 8 Berbasis RSS feed (bag2)
setelah merancang skecthflow , mari kita mulai kodiing yeay , ini terdengar menyeramkan pada awalnya tapi setelah di bantu dengan tools dari Microsoft bernama Microsoft Visual Studio , maka koding is easy , yuk kita buka visual studio kita

tampilan awal dari visual studio adalah seperti gambar di atas :)
setelah itu mari klik FILE > New Project maka akan muncul tampilan seperi ini

Pilih Windows Phone panorama App, lalu jangan lupa mengganti nama dari projek kalian menjadi sesuai dengan nama aplikasi yang akan kalian buat , lalu Klik OK
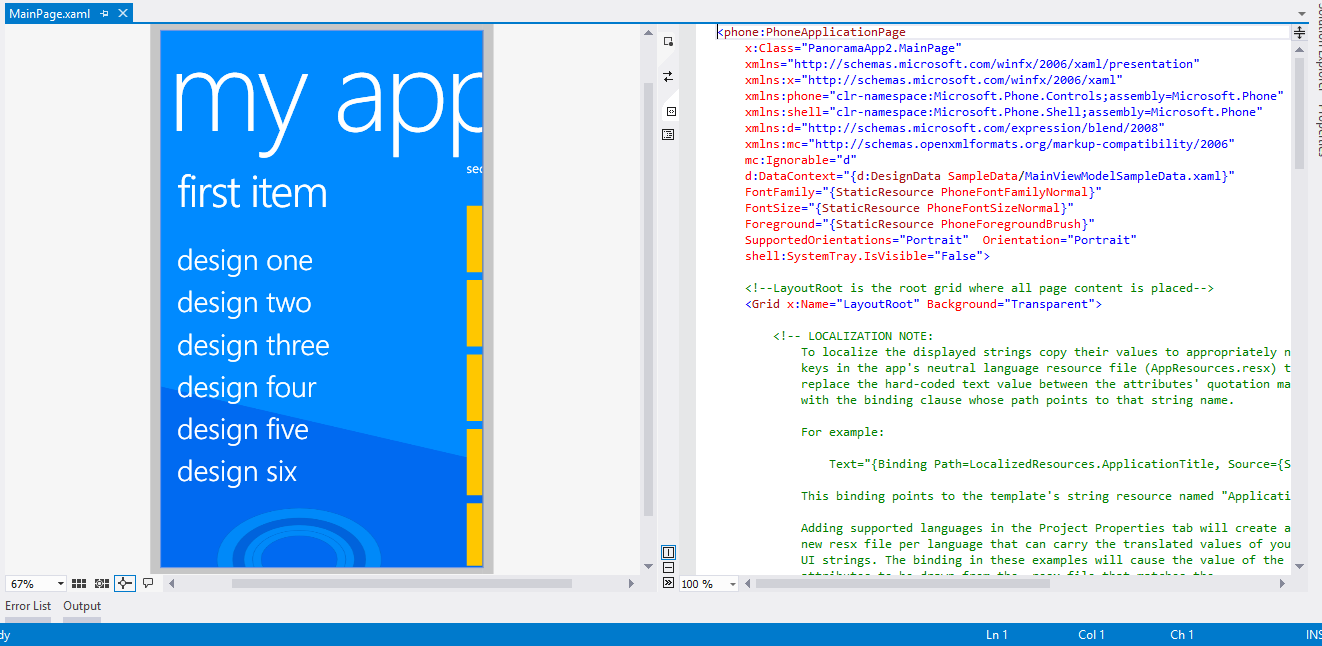
Gambar di atas adalah tampilan awal dari panorama apps developing
pada bagian sebelah kiri terapat simulasi langsung tntang aplikasi yang sedang kita rancang , dan sebelah kanan adalah barisan kode XAML yang berfungsi sebagai struktur utama dari halaman aplikasi kita ,

ubah header panorama di bagian
<phone:Panorama Title="<nama Header> "
misal saja saya menamai headernya dengan RSS reader maka kode nya
<phone:Panorama Title="<RSS Reader> "
lalu klik save , dan hasilnya akan berubah pada bagian design apps

Yep, Judul Header Telah Berubah ,
Nah begitulah cara kerja dari microsoft Visual Studio , mudah bukan ?
Tetap semangat nge-Develop yaa , pada postingan selanjtunya saya akan mengajarkan membuat Hubtile pada Panorama Desain
Selamat Malam
Langganan:
Postingan (Atom)